To setup your iVi, you need to place your iVi on a suitable surface, connect the power and USB-C cable and install software on your PC or Mac as needed.
In the box.
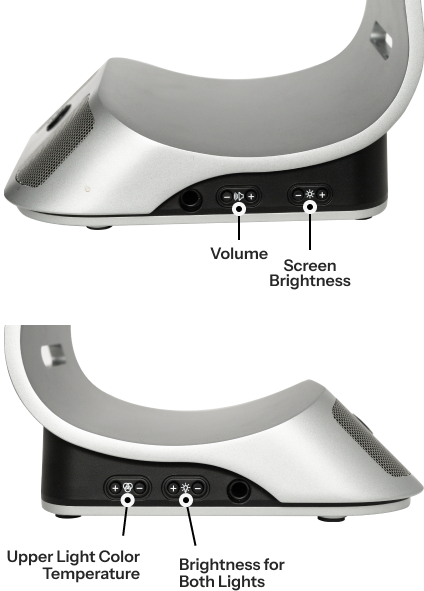
- Plug in the power adapter cord to the power adapter and the circular end to the power in on back of the iVi.
- You are supplied with 2 cables in box. A USB-C to USB-C and a USB-A to USB-C. Plug one the USB-C end of one of your cords into the “AV OUT” port in the back of the iVi.
- Connect the second end of your USB cord to your device (either USB-A or USB-C).
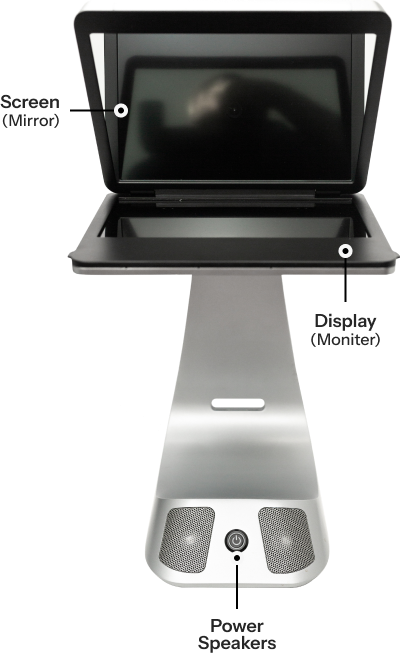
- To turn on iVi, press the power button on the front bottom of the stand for 5 seconds. When it is turned on, the button will turn blue and the light below the monitor will turn on by default.
- Light selection sequence (swipe your hand under the screen from right to left):
- Default: bottom light on.
- 1st swipe: switches top light on
- 2nd swipe: switches both lights off
- 3rd swipe: turns bottom light on
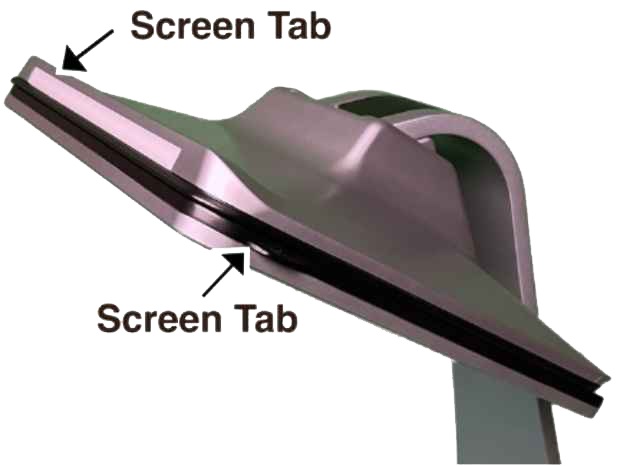
- When opening your iVi, gently pull the screen down using the tabs on either side of the screen until it rests horizontally. Please avoid exerting excessive force to open it wider than what feels comfortable.To adjust the angle of the top screen: place your hands on the top panel, and gently pull down on the screen.
Preparing your iVi.
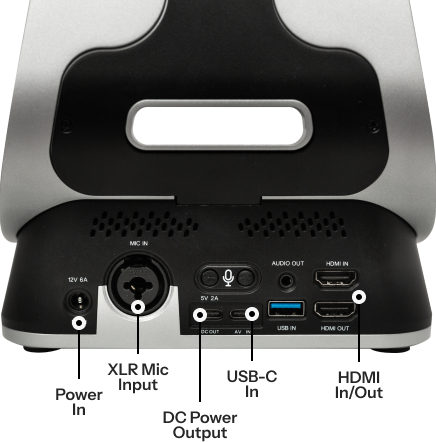
- Plug the IEC power adapter cord into the power adapter. Then insert the attached round DC plug into the power socket labelled
“12v 6A DC In” located on the right-hand side, back of iVi. - You are supplied with 2 cables in the box – a USB-C to USB-C and a USB-A to USB-C.
Plug the USB-C end of one of the cables into the “AV-IN” or “AV-OUT” port in the back of iVi. - Connect the second end of your USB-C cable to your device (either USB-A or USB-C).
- To turn on iVi, press the power button on the front bottom of the stand for ~5 seconds.
When iVi is powered on, the button will turn blue and the light below the monitor will turn on. - Light Selection sequence (swipe your hand under the screen from right to left):
- Default: bottom light on.
- 1st Swipe – switches top light on and bottom light off.
- 2nd Swipe – switches both lights off.
- 3rd Swipe – switches bottom light on and top light off.
- When opening your iVi, gently pull the bottom LCD display down using the tabs on either side of the display housing until it rests horizontally.
Please avoid exerting excessive force to open iVi wider than what feels comfortable.
To adjust the angle of the top screen, place both hands on the top panel with your thumbs resting on the corners and adjust the screen.
Using a Windows Computer.
- With iVi on and connected to your computer, R click on the desktop to access the Display settings. The Display settings can also be accessed via the Windows Logo and selecting “Settings”. Select Display settings and two display screens should be available-one will be the iVi display ( This may be labeled “No Monitor but click “identify “if unsure).
- In the dropdown menu for the iVi display select “Extend these displays”Rearrange the displays so the iVi (display 2) is shown on top or besides your main computer display (display 1) depending on the relative locations of the monitors on your desktop.
Note: Typically the required Displaylink drivers are included with the Windows operating system. If your version of Windows, however, does not support a monitor over USB, you can install the free Displaylink driver available here. Optionally you can use an HDMI cable to connect your computer to the iVi HDMI IN port located on the back of iVi.
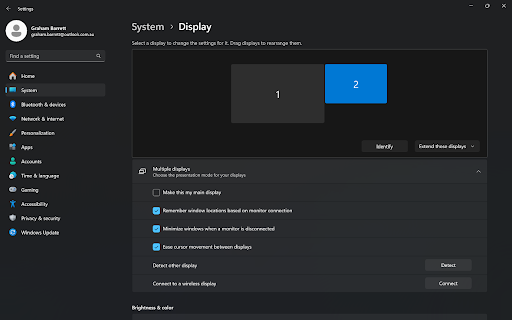
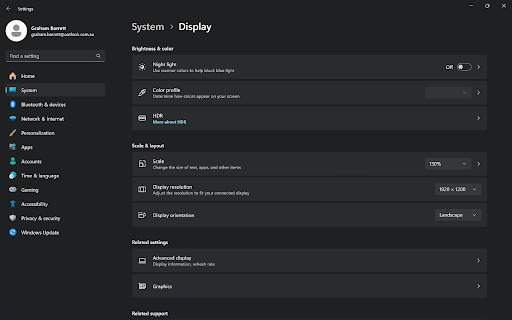
- Scroll Down and In the dropdown menu for Resolution select 1920×1200 for the iVi display. In the dropdown menu for scale select 150% or 175% to enlarge the text on the iVi display
Using a Macintosh Computer
- Before utilizing the monitor feature of iVi with a Mac the free Displaylink drivers are required and can be downloaded here.
Alternatively you can physically connect your laptop to the HDMI IN port on the back of iVi using an HDMI monitor cable (not supplied in the Box).
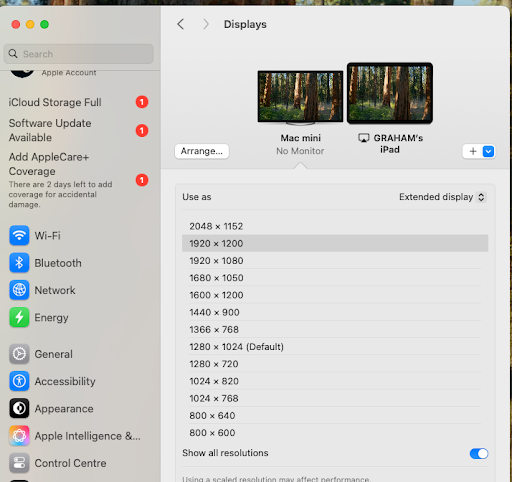
- With the iVi turned on and connected to your computer, go to System Settings and select Displays.
- The iVi will show up as an external display with the name “No Monitor”.
- Rather than using the iVi display as a mirror of your main display we recommend that it be setup as an external display.
- The selected resolution should be 1920×1200. If the desired resolution is not visible then the “Show All Resolutions” toggle should be selected.
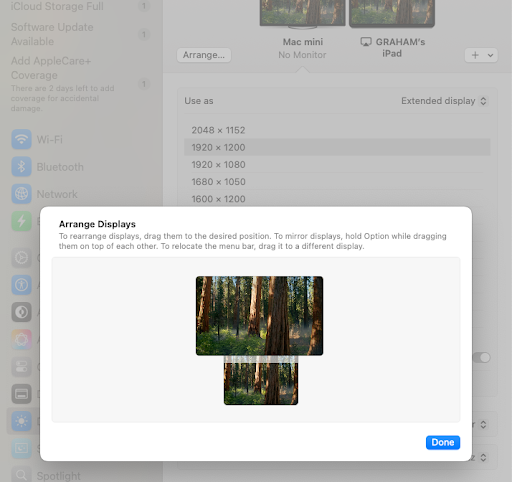
- Once the display is visible you can use the “Arrange” settings to place the iVi display next to your main display.
Virtual Meetings with iVi (Windows or Macintosh)
- When opening a virtual meeting such as Zoom open the “Camera” settings and select “IVI Camera” as the camera.
- If you have the IVICAM custom software for Windows or Macintosh downloaded and installed, however, open the app first and the iVi Camera should be selected in the IVICAM app. Then start your communications platform (e.g. Zoom, Teams or Meet) and select the ‘Virtual iVi Camera (Windows Virtual Camera)” when using Windows or “IVCAM Virtual Cam” when using Macintosh as the Camera for the communications software.
- In the communications software open the “Audio” settings and select IVI audio as the microphone and iVi audio as the speakers.
This will use the array of 4 speakers in the front of the monitor tray. The sensitivity of the internal microphone array is set automatically with AGC.Optionally you may use an external microphone using the XLR or USB connections on the back of iVi. This will automatically replace the internal microphone array.The +/- buttons beside the the microphone icon above the USB port on the back of iVi will adjust the level of the external XLR microphone.
Using the Custom IVICAM software (Windows or Mac)
- Image Control – changes core image settings (brightness, contrast, exposure, white balance and hue).

- Camera Control – changes camera settings (zoom, pan, focus, tilt and backlight).
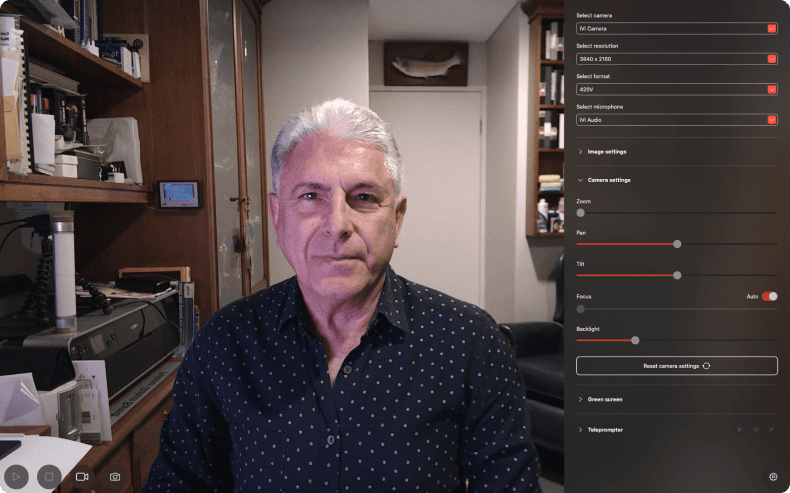
- Integrated teleprompter – Select speed, font, line spacing and document selection.

- Integrated teleprompter – Select speed, font, line spacing and document selection.

Using an iPad
The iVi device has worked with 6th generation iPad mini or later and 2nd generation iPad Pro or later.
At the time of this writing (February 2024), Apple does not directly support an external display for iPad over a USB cable.
It only supports external monitors and cameras on very recent iPad Pro with the latest iPadOS 17 or greater version.
To use a supported iPad with iVi, you need a USB-C Hub such as the Twelve South Stay Go available here.
- Connect your iPad to the USB-C Hub with a USB-C data cable.
- Connect your USB-C Hub to a power supply with a USB-C power cable.
- Connect your USB-C Hub to a iVi with a USB-C data cable.
- Also connect your USB-C Hub to a iVi with an HDMI cable to iVi HDMI In.
FAQ
A collection of frequently asked questions related to the product.
iVi is a high-end video conferencing device that combines a camera, microphone, speakers, lights, and display. It’s built to provide professional-quality video and audio, with a special focus on restoring natural eye-to-eye contact during calls.
iVi stands out with its unique eye-contact technology, the latest Sony 4K camera sensor, and premium Harman Kardon audio. It’s designed for users who want an effortless, professional video conferencing and video recording experience. Plus, it connects to any computer with just one USBC cable and works with all major platforms, such as Zoom, Teams, and more.
Setting up iVi is simple! Just connect the included USBC cable to your computer’s USB port. The device automatically works with all your existing video conferencing apps like Zoom or Teams. If you want to fine-tune your video image, you can install our included iVi CAM app for easy adjustments.
Yes! iVi is compatible with all major video conferencing platforms, including Zoom, Microsoft Teams, Google Meet, and more. No extra setup is required.
When you select your platform on your computer, easily select iVi camera and microphone.
iVi is agnostic about the video conferencing software you prefer. You and your computer make the decisions of what platform to use and how to use it.
Yes, iVi CAM app allows you to fine-tune the image to your preferences. You can adjust brightness, contrast, pan, zoom and other settings for the perfect look every time.
Due to the high-end Harman Kardon speakers for crystal-clear sound and four near-field professional-grade microphones capture your voice with exceptional clarity, ensuring that you and your audience hear everything perfectly.
The iVi’s MSRP is $2,195 US. Discounts are negotiable for larger orders.
It offers effortless, professional video conferencing. Plus, it connects to any computer with just one cable and works with all major platforms. Every iVi is packed with premium features such as 4K video resolution, top-tier audio, and effortless connectivity into one powerful device.
No special drivers are required. iVi Cam control app is available in the Apple and Microsoft stores. To fine-tune the image or audio, simply install iVi’s software for easy control.
iVi works right out of the box with your video conferencing apps.
iVi is powered with the provided power cable and transformer.
iVi comes with integrated lighting that can be adjusted for different environments, ensuring that you always look your best in a dim room or a bright office.
iVi is designed to be sleek and easy to set up, but it’s also a high-performance device meant for more permanent setups in dedicated office desks, video kiosks, home offices or workspaces. It is lightweight and easy to move if necessary!
iVi is designed for one-on-one or one-to-many.
- Camera: Latest Sony 4K sensor for crisp, high-resolution video.
- Audio: Harman Kardon speakers and professional-grade microphone for clear sound.
- Connectivity: Single- USBC cable connection to your computer.
- Compatibility: Works with all major video conferencing platforms.
- Software: iVi apps are available in both the Windows and Apple stores to fine-tune video images.
iVi’s image of you participating in meetings or webinars will immediately be noticed by others at the event. iVi was designed by the world-famous Opthomologist Dr. Graham Barrett to facilitate eye-to-eye contact with the best possible sound and video.
